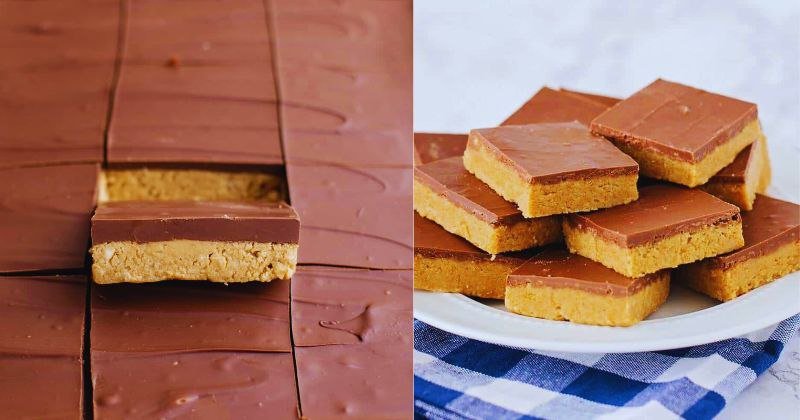
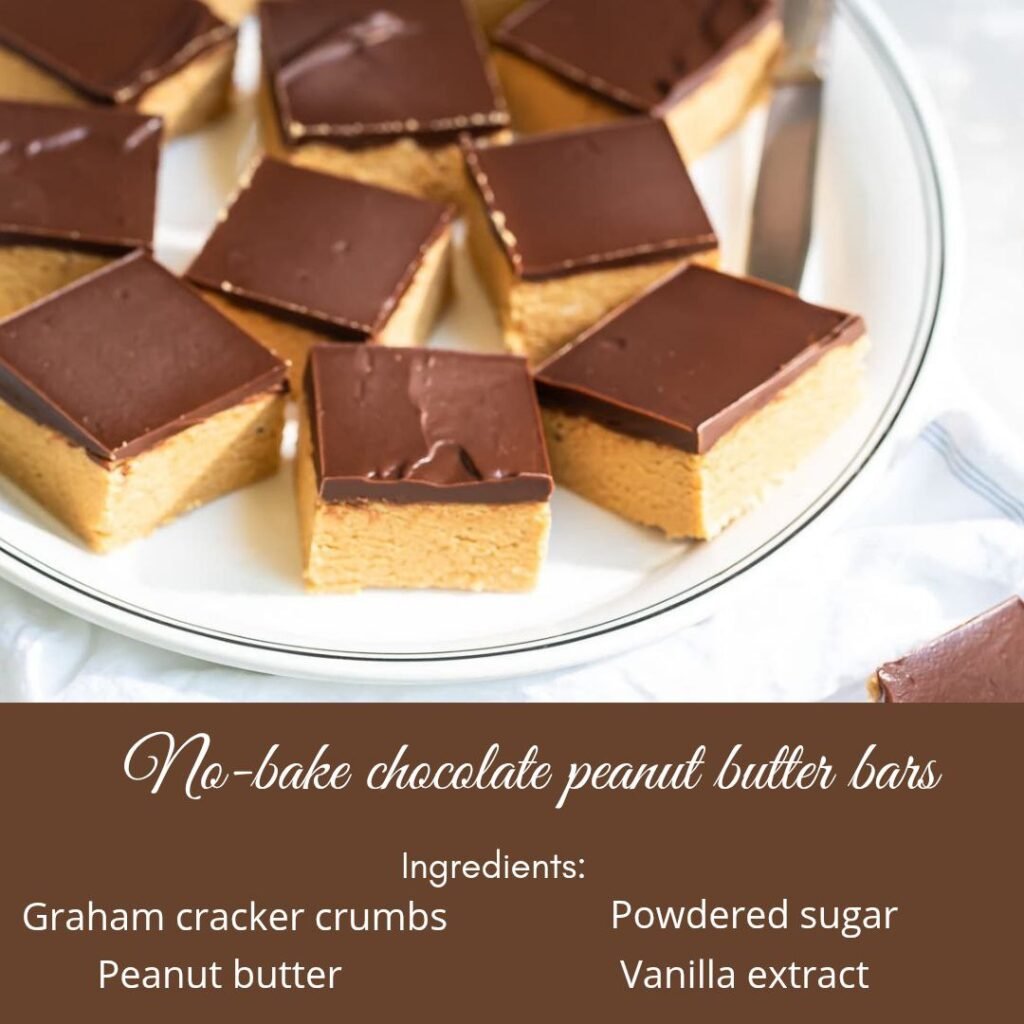
Let me tell you a secret: I’m completely obsessed with desserts that deliver maximum indulgence with zero baking skills required, and these no-bake chocolate peanut butter bars are my latest culinary love affair. There’s something absolutely magical about the way rich chocolate and creamy peanut butter come together in perfect harmony, creating layers of flavor that’ll surprise your taste buds with every single bite. These no-bake chocolate peanut butter bars were born from those moments when I desperately craved something sweet but didn’t want to turn on the oven, and now they’ve become my go-to treat for everything from potluck contributions to late-night dessert emergencies. The best part? They taste like they came from an expensive bakery, but require nothing more than a few simple ingredients and some patience while they set.
Table of Contents
Why This Recipe Is Everything
• Zero-bake perfection: Transform pantry staples into bakery-quality dessert bars without ever touching your oven – because sometimes the most incredible treats come from the simplest techniques that anyone can master
• Foolproof success magic: With just mixing and layering required, these bars are virtually impossible to mess up, making them perfect for beginner bakers or anyone who wants guaranteed delicious results every single time
• Make-ahead convenience: These beauties actually get better as they chill, developing deeper flavors and perfect texture – it’s everything you want when you need to prep desserts in advance for parties or meal planning
• Crowd-pleasing flavor combination: The classic pairing of rich chocolate and creamy peanut butter creates that nostalgic comfort food experience that appeals to kids and adults alike, making every bite pure happiness
Key Ingredients That Make the Magic
Creamy Peanut Butter (1 cup): This is the star of our show, providing that rich, nutty foundation that makes these bars absolutely irresistible. Choose a high-quality brand without added oils or sugars for the best flavor and consistency – natural peanut butter works beautifully here.
Graham Cracker Crumbs (2 cups): These create the perfect textural base that holds everything together while adding that subtle honey-sweetened crunch. You can buy pre-made crumbs or crush whole crackers in a food processor for fresher flavor.
Powdered Sugar (2 cups): Sifted smooth, this sweetens our peanut butter layer while creating that melt-in-your-mouth texture that makes these bars feel luxurious. The fine texture dissolves perfectly without any grittiness.
Unsalted Butter (1 stick, melted): This binds our base layer together and adds richness that complements both the peanut butter and chocolate beautifully. Unsalted gives you complete control over the flavor balance.
Semi-Sweet Chocolate Chips (2 cups): The crowning glory that creates our glossy chocolate topping. Choose high-quality chips or chop a good chocolate bar for the smoothest melting and most intense chocolate flavor.
Coconut Oil (2 tablespoons): This secret ingredient helps our chocolate layer set with that perfect snap while adding subtle richness. It creates a professional-looking finish that stays firm at room temperature.
Vanilla Extract (1 teaspoon): A small amount that enhances all the other flavors and adds depth to the overall taste profile. Pure vanilla extract makes all the difference in the final result.
Sea Salt (pinch): Optional but highly recommended for sprinkling on top – it enhances the chocolate and peanut butter flavors while adding that gourmet touch that elevates everything.
Substitution secrets: Swap almond butter or sunflower seed butter for peanut-free options, use crushed vanilla wafers instead of graham crackers for different flavor, and dark chocolate chips create a more sophisticated taste profile.
Step-by-Step Instructions
- Prepare your workspace like a pro (3 minutes): Line an 8×8 or 9×9 inch square pan with parchment paper, leaving overhang for easy removal later. This step is crucial for getting perfect bars that lift out cleanly – trust me, you don’t want to skip this part.
- Create the magical base mixture (5 minutes): In a large mixing bowl, combine the melted butter, creamy peanut butter, and vanilla extract. Whisk until completely smooth and well combined – the mixture should be glossy and uniform without any streaks.
- Build the foundation layer (4 minutes): Add the graham cracker crumbs and powdered sugar to your peanut butter mixture. Stir with a wooden spoon or sturdy spatula until everything comes together into a cohesive, slightly sticky mixture that holds together when pressed.
- Press with purpose (3 minutes): Transfer the mixture to your prepared pan and press firmly with clean hands or the bottom of a measuring cup. You want an even, compact layer that reaches all corners – this creates the perfect foundation for our chocolate topping.
- Chill for structure (15 minutes): Pop the pan into the refrigerator while you prepare the chocolate layer. This initial chilling helps the base set up so the chocolate won’t sink in when you pour it on top.
- Master the chocolate layer (4 minutes): In a microwave-safe bowl, combine chocolate chips and coconut oil. Microwave in 30-second intervals, stirring between each, until completely smooth and glossy. Alternatively, melt in a double boiler for more controlled heating.
- Create the perfect finish (2 minutes): Pour the melted chocolate over the chilled peanut butter layer, using an offset spatula to spread it evenly to all edges. The chocolate should create a smooth, glossy top that covers every bit of the base.
- Add the gourmet touch (30 seconds): While the chocolate is still warm, sprinkle with a pinch of flaky sea salt if desired. This optional step adds a professional bakery touch that really makes the flavors pop.
- The patience game (2 hours minimum): Refrigerate the bars for at least 2 hours, or until the chocolate is completely set and firm to the touch. For the cleanest cuts, chill for 3-4 hours or even overnight.
- Perfect portioning (5 minutes): Using the parchment overhang, lift the bars out of the pan onto a cutting board. Use a sharp knife wiped clean between cuts to create perfect squares – usually 16 bars from a 9×9 pan.
Pro Tips for Perfect Results
• Don’t skimp on the chilling time between layers – that initial 15-minute refrigeration prevents the chocolate from sinking into the peanut butter base and ensures distinct, beautiful layers that look professional.
• Let the melted chocolate cool slightly before pouring it over the base layer. If it’s too hot, it can melt the peanut butter layer underneath, creating muddy flavors instead of clean, distinct tastes.
• Press the base layer firmly and evenly to prevent crumbly bars that fall apart when cut. The more compact your foundation, the cleaner your final cuts will be and the better the bars will hold together.
• Use room temperature ingredients when possible for easier mixing and smoother consistency. Cold peanut butter is harder to work with and may create lumps in your base layer.
• Invest in parchment paper with overhang for the easiest removal and cleanest presentation. Trying to cut bars in the pan leads to messy edges and frustrated attempts to serve them properly.
• Clean your knife between cuts with a warm, damp cloth to prevent chocolate buildup that creates ragged edges. Sharp, clean cuts make all the difference in presentation.
Serving Suggestions
• Coffee Shop Presentation: Cut into small squares and serve on a pretty platter with coffee or espresso for an elegant afternoon treat
• Ice Cream Sundae Topping: Chop into chunks and use as a decadent topping for vanilla or chocolate ice cream
• Gift Box Perfect: Individually wrap squares in cellophane for beautiful homemade gifts that show you care
• Party Platter Success: Arrange on a dessert table alongside fresh berries and whipped cream for color contrast
• Milk Pairing Classic: Serve with ice-cold milk for that nostalgic comfort food experience that never gets old
• Wine Night Surprise: Pair with a rich red wine or port for an unexpected but delightful adult dessert experience
Nutritional Benefits
While these no-bake chocolate peanut butter bars are definitely an indulgent treat, they do offer some nutritional value alongside their incredible taste. Peanut butter provides protein and healthy fats that help satisfy cravings and provide sustained energy. The chocolate contributes antioxidants, particularly if you choose dark chocolate chips. For healthier versions, try using natural peanut butter without added sugars, substitute some of the powdered sugar with protein powder, or add chopped nuts for extra protein and healthy fats. These bars prove that treats can be part of a balanced approach to eating when enjoyed mindfully.
Frequently Asked Questions
Q: How long do these no-bake chocolate peanut butter bars keep? A: Stored in an airtight container in the refrigerator, these bars stay fresh for up to one week. For longer storage, they freeze beautifully for up to 3 months – just thaw at room temperature for 15 minutes before serving for the perfect texture.
Q: Can I make these bars in different pan sizes? A: Absolutely! Use a 9×13 pan for thinner bars that serve more people, or stick with 8×8 for thicker, more decadent portions. Just adjust chilling time accordingly – thinner bars set faster, while thicker ones may need extra time to firm up properly.
Q: What’s the best way to get clean, professional-looking cuts? A: Use a sharp knife warmed under hot water and wiped clean between each cut. The warm blade melts through the chocolate layer smoothly, creating those bakery-perfect edges that make your bars look professionally made.
Q: Can I add extra ingredients to customize these bars? A: Yes! Try folding chopped peanuts, mini marshmallows, or crushed pretzels into the base layer for extra texture. You can also drizzle melted white chocolate over the set bars for an elegant finishing touch that really impresses guests.
Recipe Details:
- Prep Time: 15 minutes
- Chill Time: 2-3 hours
- Total Time: 2 hours 15 minutes
- Servings: 16 bars
- Difficulty: Beginner-Friendly
Complete Ingredient List:
- 1 cup creamy peanut butter
- 2 cups graham cracker crumbs
- 2 cups powdered sugar, sifted
- 1 stick (1/2 cup) unsalted butter, melted
- 2 cups semi-sweet chocolate chips
- 2 tablespoons coconut oil
- 1 teaspoon vanilla extract
- Pinch of flaky sea salt (optional)
These no-bake chocolate peanut butter bars have become my absolute favorite way to satisfy dessert cravings without any fuss or complicated techniques. The combination of simplicity and incredible flavor makes them perfect for any occasion, and I guarantee once you try this foolproof method, they’ll become a regular in your dessert rotation. Now get in that kitchen and create some no-bake magic!