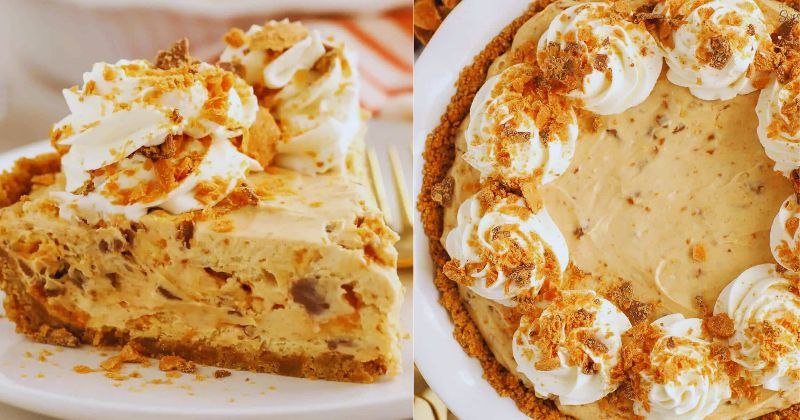
Let me tell you a secret: I’m obsessed with desserts that make people stop mid-conversation and ask, « What IS this? » This Butterfinger pie is my latest culinary love affair – a no-bake masterpiece that combines the irresistible crunch of Butterfinger candy bars with silky smooth peanut butter filling and a chocolate graham cracker crust. It’s the kind of dessert that turns casual dinner guests into your biggest fans and has people texting you for the recipe at midnight.
I discovered this recipe during a particularly stressful week when I needed to bring something spectacular to a potluck but had zero time for complicated baking. What started as a desperate kitchen experiment became my most requested dessert. The magic lies in how the salty-sweet Butterfinger pieces create these perfect little flavor bombs throughout each creamy bite, while the no-bake approach means you can whip this up in minutes and let the refrigerator do all the work.
Table of Contents
Why This Recipe Is Everything
- Effortless elegance: This no-bake Butterfinger pie delivers restaurant-quality results without turning on your oven or breaking a sweat
- Texture paradise: The contrast between the crunchy chocolate crust, silky peanut butter filling, and those addictive Butterfinger chunks creates pure dessert magic
- Make-ahead perfection: This pie actually gets better as it sits, making it the ultimate stress-free entertaining dessert that you can prepare a full day ahead
- Crowd-pleasing guaranteed: I’ve never met anyone who doesn’t fall head-over-heels for this combination of chocolate, peanut butter, and that distinctive Butterfinger crunch
Key Ingredients That Make the Magic
Butterfinger Candy Bars (6 full-size bars): The star of the show, bringing that iconic honeycomb toffee crunch and peanut butter flavor that makes this pie absolutely irresistible. Don’t even think about substituting – the unique texture of Butterfinger is what makes this dessert legendary.
Cream Cheese (16 oz, room temperature): The foundation of our silky filling, providing richness and stability. Make sure it’s completely softened or you’ll end up with lumps that no amount of beating can smooth out.
Creamy Peanut Butter (1 cup): Choose a high-quality brand like Jif or Skippy for the best flavor and consistency. Natural peanut butter can make the filling too oily, so stick with the processed stuff for this recipe.
Powdered Sugar (1½ cups): Sweetens and stabilizes the filling while keeping the texture perfectly smooth. Sift it if you’re feeling fancy, but honestly, good beating will take care of any lumps.
Heavy Whipping Cream (2 cups): Whipped to soft peaks, this creates the light, airy texture that makes each bite feel like a cloud of peanut butter heaven. Don’t over-whip or you’ll end up with butter!
Chocolate Graham Crackers (2 sleeves): Creates the perfect crunchy foundation with a hint of chocolate that complements the Butterfinger beautifully. Regular graham crackers work too, but chocolate takes it to the next level.
Unsalted Butter (6 tablespoons, melted): Binds the crust together while adding richness. Salted butter works in a pinch, but unsalted gives you better control over the overall flavor balance.
Cool Whip (1 container, 8 oz): For the topping layer that makes this pie look professionally made. You can substitute freshly whipped cream, but Cool Whip holds its shape longer for presentation purposes.

Step-by-Step Instructions
- Prep your Butterfinger bars (10 minutes): Place 4 candy bars in the freezer for about 15 minutes – this makes them easier to chop without getting sticky. Once chilled, roughly chop them into chunky pieces about the size of large peas. You want irregular pieces for the best texture contrast. Set aside 2 bars for the topping.
- Create the chocolate crust (15 minutes): Crush the chocolate graham crackers into fine crumbs using a food processor or by placing them in a sealed bag and going to town with a rolling pin (great stress relief, by the way). Mix the crumbs with melted butter until the mixture holds together when pressed. Press firmly into the bottom and up the sides of a 9-inch pie pan. The key here is even pressure – use a flat-bottomed measuring cup to really pack it down. Refrigerate while you make the filling.
- Master the peanut butter base (10 minutes): In a large mixing bowl, beat the room-temperature cream cheese until it’s completely smooth and fluffy – about 3-4 minutes with an electric mixer. This step is crucial for avoiding lumps later. Gradually add the peanut butter, beating continuously until perfectly combined. The mixture should be smooth and creamy, not grainy.
- Sweeten and stabilize (5 minutes): Slowly add the powdered sugar, beating on low speed initially to prevent a sugar cloud explosion in your kitchen (learned this the hard way). Once incorporated, increase speed and beat until the mixture is light and fluffy. This is your flavor base, so taste and adjust sweetness if needed.
- Create the perfect whipped cream (8 minutes): In a separate chilled bowl with chilled beaters, whip the heavy cream until soft peaks form. This usually takes 3-4 minutes, but watch carefully – the difference between perfect whipped cream and butter happens in about 30 seconds. You want peaks that hold their shape but still look creamy, not grainy.
- The gentle fold technique (5 minutes): Here’s where technique matters. Gently fold the whipped cream into the peanut butter mixture in three additions, using a large spoon or spatula. The key word is « fold » – don’t stir or beat, which will deflate all that beautiful airiness you just created. Add your chopped Butterfinger pieces with the last addition of whipped cream.
- Assembly magic (10 minutes): Spoon the filling into your prepared crust, spreading it evenly with an offset spatula. The filling should dome slightly above the crust – this is perfect. Spread the Cool Whip over the top in decorative swirls, then chop your remaining 2 Butterfinger bars and sprinkle generously over the surface.
- The patience game (4+ hours): Refrigerate for at least 4 hours, but overnight is even better. This isn’t just about setting – the flavors meld and develop during this time, creating that perfect harmony between all the elements.
Pro Tips for Perfect Results
- Don’t skimp on chilling time: Let the Butterfinger pieces marinate in that creamy filling for maximum flavor development – overnight refrigeration creates the most incredible taste
- Room temperature cream cheese is non-negotiable: Cold cream cheese will create lumps that no amount of beating can fix. Take it out 2-3 hours before you plan to bake, or microwave in 15-second intervals if you’re in a rush
- Freeze your mixing bowl and beaters: Cold equipment whips cream faster and more reliably – it’s an old pastry chef trick that never fails
- Cut with confidence: Use a sharp knife dipped in warm water and wiped clean between cuts for those Instagram-worthy slice shots
- Make it your own: Try crushing different candy bars like Snickers or Heath bars for exciting variations that’ll keep people guessing
- Storage secret: Cover tightly with plastic wrap pressed directly onto the surface to prevent that weird refrigerator skin from forming
Serving Suggestions
- Coffee shop vibes: Serve with freshly brewed coffee or espresso – the bitter notes perfectly complement the sweet, nutty flavors
- Elegant dinner party: Pair with a small glass of milk or vanilla-infused cream for a sophisticated twist on childhood favorites
- Summer entertaining: Add a scoop of vanilla ice cream alongside each slice for the ultimate indulgent experience
- Holiday magic: Garnish with a drizzle of chocolate sauce and a sprinkle of sea salt for that gourmet restaurant presentation
- Kid-friendly fun: Serve with extra crushed Butterfinger bars on the side for little hands to sprinkle on top
Nutritional Benefits
While this Butterfinger pie is definitely an indulgent treat, it does pack some surprising nutritional benefits. The peanut butter provides protein and healthy fats that help slow sugar absorption, while the cream cheese adds calcium and protein. The key is portion control – a small slice of this rich dessert is incredibly satisfying, so you’ll naturally eat less than you might with lighter desserts that leave you wanting more.
For dietary modifications, you can substitute sugar-free pudding mix and reduced-fat cream cheese to lighten things up, though the texture will be slightly different. The recipe is naturally gluten-free if you use gluten-free graham crackers for the crust.
Frequently Asked Questions
Can I make this pie ahead of time? Absolutely! This Butterfinger pie actually improves with time, developing deeper flavors as it sits. Make it up to 2 days ahead and store covered in the refrigerator. The texture and taste will be even better than fresh-made.
What if my filling turns out too soft? This usually happens when the cream cheese wasn’t at proper room temperature or the whipped cream was under-whipped. Try refrigerating the pie for an extra few hours – it often firms up beautifully. If it’s still too soft, you can fold in a packet of instant vanilla pudding mix to help stabilize it.
Can I freeze this pie? Yes, but with some caveats. The pie freezes well for up to 1 month, but the texture of the whipped cream changes slightly upon thawing. Thaw in the refrigerator overnight and add fresh Cool Whip and Butterfinger pieces on top before serving for the best presentation.
My crust is too crumbly – what went wrong? Usually this means not enough butter or not pressing firmly enough. The mixture should hold together when squeezed in your palm. If it’s too dry, add melted butter one tablespoon at a time until it comes together, then press very firmly into the pan using a flat-bottomed measuring cup.
This Butterfinger pie isn’t just a dessert – it’s a conversation starter, a memory maker, and quite possibly the easiest way to become everyone’s favorite person to invite to dinner. Trust me, once you master this recipe, you’ll find yourself making it for every occasion, and people will start planning their gatherings around whether you’re bringing « that amazing pie. » So go ahead, surprise your taste buds and prepare to become completely obsessed with your new signature dessert!