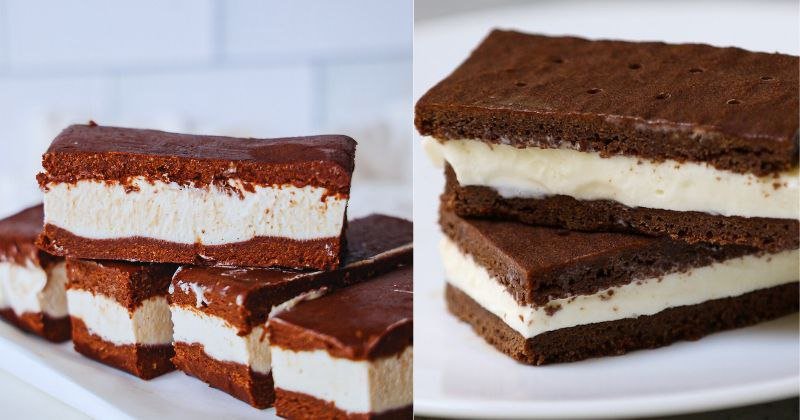
I’m obsessed with desserts that transport you straight back to childhood – and these homemade ice cream sandwiches are pure nostalgic magic. There’s something absolutely irresistible about biting into a soft, chewy chocolate cookie with that perfect contrast of cold, creamy ice cream in the middle. This isn’t just any frozen treat; it’s my perfected version that captures all the joy of those store-bought classics but with infinitely better flavor and that homemade touch that makes everything special.
Let me tell you why I fell in love with making these from scratch: you get to control every single element, from the richness of the chocolate cookies to the exact flavor and texture of the ice cream filling. These homemade ice cream sandwiches have become my go-to summer dessert, my secret weapon for impressing guests, and honestly, my favorite way to beat the heat while satisfying that sweet tooth.
Table of Contents
Why This Recipe Is Everything
- Perfect texture balance: Soft, chewy cookies that won’t crack your teeth when frozen, paired with smooth, creamy ice cream that doesn’t turn rock-hard
- Customizable magic: Choose your favorite ice cream flavors and cookie combinations for endless possibilities that surprise your taste buds
- Make-ahead brilliance: These freeze beautifully for weeks, giving you restaurant-quality desserts ready whenever cravings strike
- Nostalgic perfection: All the childhood memories of store-bought treats, elevated with homemade love and premium ingredients
Key Ingredients That Make the Magic
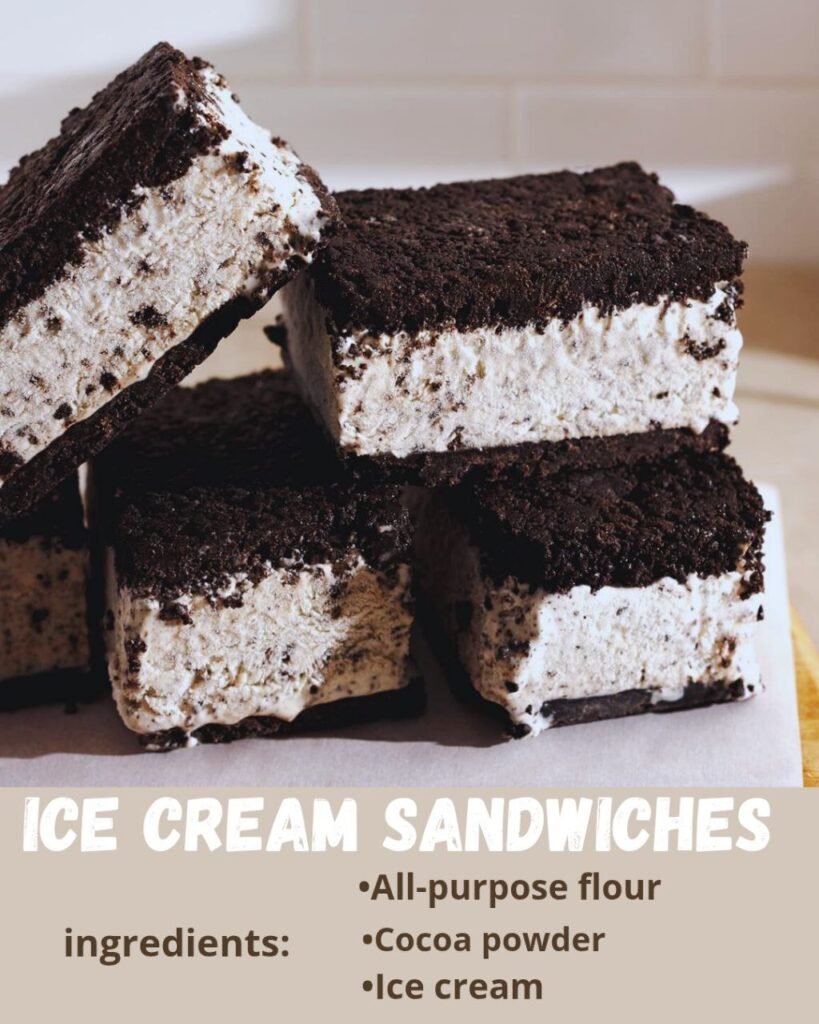
All-Purpose Flour (2½ cups): The foundation of our cookie perfection. This creates the ideal structure that stays tender even when frozen. Don’t substitute with cake flour – we need that slight chewiness.
Unsweetened Cocoa Powder (¾ cup): Go for Dutch-processed if you have it – it creates deeper, richer chocolate flavor that won’t compete with your ice cream. Regular cocoa works too, but Dutch-processed is pure chocolate luxury.
Brown Sugar (1½ cups, packed): The secret to cookies that stay soft when frozen. Brown sugar’s molasses content creates moisture and chewiness that white sugar just can’t match. Pack it firmly for accurate measurement.
Unsalted Butter (¾ cup, softened): Room temperature butter creams beautifully with the sugars, creating that perfect cookie texture. Take it out of the fridge about an hour before baking.
Large Eggs (2): These bind everything together and add richness. Room temperature eggs incorporate more easily – place them in warm water for 5 minutes if you forgot to take them out early.
Vanilla Extract (2 teaspoons): Pure vanilla only, please. This enhances all the other flavors without being overpowering. The fake stuff just doesn’t compare.
Baking Soda (1 teaspoon): Creates the perfect lift and that slightly crispy edge while keeping centers soft. Fresh baking soda makes all the difference.
Salt (½ teaspoon): Enhances the chocolate flavor and balances all that sweetness. Never skip the salt in chocolate desserts.
Your Favorite Ice Cream (2 quarts): This is where you get creative! Vanilla is classic, but strawberry, mint chip, or cookies and cream all work beautifully. Let it soften slightly for easier spreading – about 10-15 minutes out of the freezer.
Step-by-Step Instructions
Prep Time: 30 minutes
Bake Time: 10-12 minutes per batch
Assembly Time: 20 minutes
Freeze Time: 4 hours minimum
Total Time: 6 hours
Servings: 12 sandwiches
- Set up for success (5 minutes): Preheat your oven to 350°F and line two large baking sheets with parchment paper. Trust me, parchment is essential here – these cookies can stick, and you want perfect edges for your sandwiches.
- Mix the dry team (3 minutes): In a medium bowl, whisk together flour, cocoa powder, baking soda, and salt. Give it a really good whisk to break up any cocoa clumps – nobody wants chalky spots in their cookies.
- Cream the dream team (5 minutes): In a large bowl, cream the softened butter and brown sugar with an electric mixer until light and fluffy – about 3-4 minutes. This step is crucial for texture, so don’t rush it. The mixture should look noticeably lighter in color.
- Add the binding magic (2 minutes): Beat in eggs one at a time, then add vanilla. Mix until just combined. The mixture might look slightly separated – that’s totally normal and will come together when you add the flour.
- Bring it all together (3 minutes): Gradually add the flour mixture to the butter mixture, mixing on low speed until just combined. Don’t overmix – stop as soon as you don’t see streaks of flour. Overmixed cookies equal tough cookies.
- Shape with precision (8 minutes): Using a cookie scoop or spoons, drop rounded tablespoons of dough onto prepared baking sheets, spacing them about 2 inches apart. You want 24 evenly sized cookies for 12 perfect sandwiches. I like to gently flatten each cookie slightly with my fingers for even baking.
- Bake to perfection (10-12 minutes): Bake for 10-12 minutes, until the edges are set but centers still look slightly soft. They’ll continue cooking on the hot pan, so don’t overbake – we want chewy, not crispy.
- Cool completely (20 minutes): Let cookies cool on the baking sheet for 5 minutes, then transfer to a wire rack to cool completely. This is crucial – even slightly warm cookies will melt your ice cream.
- Assembly time (15 minutes): Take your ice cream out to soften for 10-15 minutes. Turn half the cookies upside down, spread about ⅓ cup of softened ice cream on each, then top with remaining cookies. Press gently to spread ice cream to the edges.
- The final freeze (4+ hours): Wrap each sandwich individually in plastic wrap or place in an airtight container. Freeze for at least 4 hours before serving. They’ll keep beautifully for up to 2 weeks.
Pro Tips for Perfect Results
- Don’t skimp on cooling time: Completely cooled cookies are essential – even slightly warm cookies will turn your ice cream into a melted mess. Patience pays off here.
- Let the ice cream soften strategically: Too hard and it’ll crack your cookies; too soft and it’ll squish out the sides. That 10-15 minute sweet spot gives you spreadable perfection.
- Size consistency is everything: Use a cookie scoop for uniformly sized cookies that create perfectly matched sandwich pairs. Mismatched sizes look amateur and don’t stack well.
- Wrap individually for storage: This prevents freezer burn and makes grabbing a single sandwich easy. I use plastic wrap, but parchment paper works too.
- Choose your ice cream wisely: Avoid super chunky flavors that might break your cookies. Smooth or lightly textured flavors work best for structural integrity.
- Plan your timing: These need that full 4-hour freeze to set properly. I love making them in the morning for evening dessert or the night before a party.
Serving Suggestions
These homemade ice cream sandwiches are perfect for any occasion:
- Summer barbecues: Serve alongside grilled fruit or in a big tub of ice for self-serve convenience
- Birthday parties: Create a DIY bar with different cookie and ice cream flavor combinations
- Pool parties: They’re the ultimate poolside treat that won’t melt as fast as regular ice cream
- Elegant presentation: Dust with powdered sugar or drizzle with chocolate sauce for dinner parties
- Creative garnishes: Roll edges in mini chocolate chips, chopped nuts, or colorful sprinkles
- Beverage pairings: Serve with cold milk, iced coffee, or even a dessert wine for adult gatherings
Nutritional Benefits
While these are definitely an indulgent treat, you can feel good about the quality ingredients. The cocoa powder provides antioxidants and that deep chocolate satisfaction, while eggs contribute protein and healthy fats. For lighter versions, try using frozen yogurt instead of ice cream, or make smaller sandwich portions.
You can also experiment with healthier cookie bases – adding a cup of oat flour or using coconut sugar instead of brown sugar. The beauty of homemade is complete control over your ingredients.
Frequently Asked Questions
Can I make these with store-bought cookies? Absolutely! Choose soft chocolate wafer cookies and follow the same assembly process. Just make sure they’re completely room temperature and not too crispy – you want them to yield slightly when bitten rather than shatter.
How long do these keep in the freezer? Properly wrapped homemade ice cream sandwiches will keep for up to 2 weeks in the freezer. After that, they might develop freezer burn, though they’ll still be safe to eat. For best quality, consume within the first week.
My cookies cracked when I assembled them – what went wrong? This usually means your cookies were either too crispy from overbaking or your ice cream was too hard. Next time, bake a minute less and make sure your ice cream has that perfect spreadable consistency – soft but not melting.
Can I use different cookie flavors? Definitely! Sugar cookies make fantastic vanilla sandwiches, peanut butter cookies pair beautifully with chocolate ice cream, and oatmeal cookies work wonderfully with cinnamon or butter pecan ice cream. The possibilities are endless.
These homemade ice cream sandwiches represent everything I love about summer desserts – they’re nostalgic, customizable, and absolutely delicious. The combination of soft, chocolatey cookies and your favorite ice cream creates pure frozen bliss that’ll have everyone asking for seconds.
The best part? Once you master this technique, you’ll never want to buy store-bought ice cream sandwiches again. The homemade version is infinitely better, more satisfying, and gives you bragging rights that last all season long.
So grab your mixing bowls, choose your favorite ice cream flavors, and get ready to create some seriously impressive frozen treats. Your freezer is about to become the most popular destination in your house!