Let me tell you a secret: I’m completely obsessed with desserts that look fancy but are secretly simple to make. These no-bake Oreo cheesecake cups are my latest culinary love affair – individual portions of creamy, dreamy perfection that’ll have everyone thinking you spent hours in the kitchen when you barely broke a sweat.
Picture this: velvety smooth cheesecake filling layered with crushed Oreo cookies, all nestled in adorable individual cups that are perfect for entertaining or treating yourself after a long day. These no-bake Oreo cheesecake cups deliver restaurant-quality taste at home without ever turning on your oven. Trust me, once you master this recipe, you’ll be making excuses to whip up a batch every weekend.
Table of Contents
Why This Recipe Is Everything
- No-bake magic: Zero oven time means these beauties come together in minutes and are perfect for hot summer days when you can’t bear to heat up the kitchen
- Individual portion perfection: Each cup is perfectly portioned, making them ideal for parties, portion control, or just looking incredibly professional
- Make-ahead friendly: These cups actually improve overnight, making them the ultimate stress-free dessert for entertaining
- Customizable layers: You control exactly how much Oreo crunch goes into each cup, creating your perfect cookie-to-cream ratio
Key Ingredients That Make the Magic
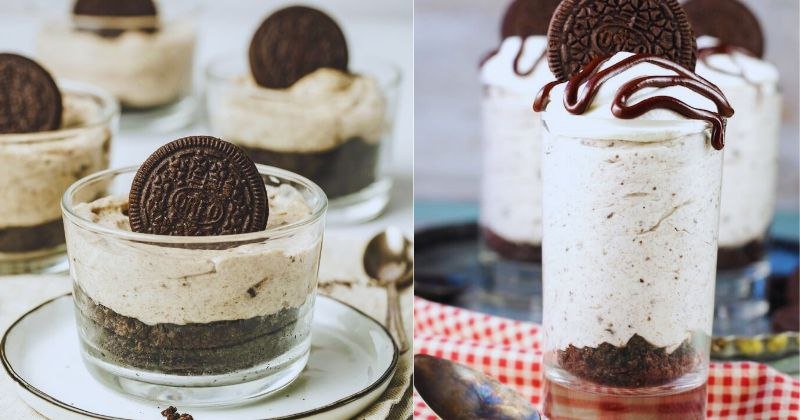
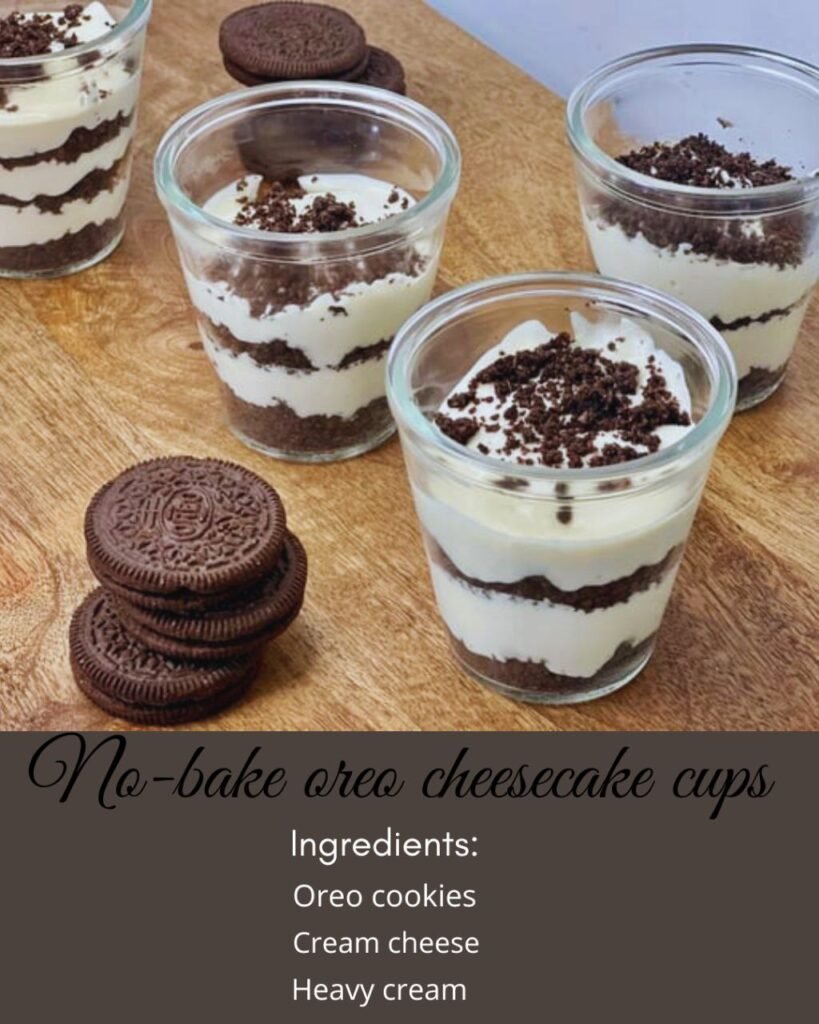
Oreo Cookies: The star of the show, bringing that iconic chocolate cookie crunch and cream flavor that makes these cups absolutely irresistible. I use about 24 cookies total – some for the crust layer and some for topping.
Cream Cheese: Full-fat cream cheese is non-negotiable here. Make sure it’s completely softened to room temperature for the silkiest, lump-free filling. Low-fat versions will give you a grainy texture that just isn’t worth it.
Heavy Whipping Cream: This is what gives our cheesecake that light, airy texture without being too dense. Don’t substitute with milk – we need that fat content for proper whipping and richness.
Powdered Sugar: Smoother than granulated sugar and dissolves effortlessly into our cream cheese mixture. It also helps stabilize our whipped cream component.
Vanilla Extract: Pure vanilla extract adds depth and warmth to balance the sweetness. Don’t skip this flavor enhancer.
Butter: Just a touch of melted butter helps bind our Oreo crumb crust and adds richness to each bite.
Step-by-Step Instructions
Prep Time: 20 minutes
Chill Time: 4 hours (or overnight)
Total Time: 4 hours 20 minutes
Servings: 8 cups
Ingredients:
- 24 Oreo cookies, divided
- 3 tablespoons butter, melted
- 16 oz cream cheese, softened to room temperature
- 1 cup powdered sugar
- 1 teaspoon vanilla extract
- 1½ cups heavy whipping cream, cold
- Additional Oreo cookies for garnish
- Prepare your Oreo crumbs: Separate 16 Oreo cookies and place them in a food processor. Pulse until you have fine crumbs with some slightly larger pieces for texture. Don’t over-process – we want some delightful chunks, not powder. Mix these crumbs with melted butter until they hold together when pressed.
- Create the crust layer: Divide the buttered Oreo crumbs among 8 clear glasses or cups (about 2 tablespoons per cup). Press down firmly with the back of a spoon to create a solid base. This crust layer is crucial – it prevents the cheesecake from sliding around and adds that essential cookie crunch.
- Make the cheesecake filling: In a large bowl, beat the softened cream cheese until completely smooth and fluffy, about 3-4 minutes. Scrape down the sides frequently. Gradually add powdered sugar and vanilla, beating until well combined and silky smooth.
- Whip the cream: In a separate chilled bowl, whip the cold heavy cream until soft peaks form. Don’t over-whip or you’ll end up with butter instead of fluffy cream. The peaks should hold their shape but still look glossy and smooth.
- Fold it all together: Gently fold one-third of the whipped cream into the cream cheese mixture to lighten it. Then fold in the remaining whipped cream in two additions, being careful not to deflate the airiness we just created. The mixture should be light, fluffy, and completely uniform.
- Assemble the cups: Spoon or pipe the cheesecake mixture over the Oreo crust in each cup, filling them about ¾ full. Level the tops with an offset spatula for that professional bakery look.
- Add the finishing touches: Crush the remaining 8 Oreo cookies into chunky pieces and sprinkle over each cup. Cover with plastic wrap and refrigerate for at least 4 hours, though overnight is even better for the flavors to meld perfectly.
Pro Tips for Perfect Results
- Don’t skimp on the softening time: Room temperature cream cheese is absolutely crucial. Cold cream cheese will create lumps no matter how long you beat it. Take it out of the fridge 2-3 hours before you plan to make these.
- Chill your bowl and beaters: For the fluffiest whipped cream, place your mixing bowl and beaters in the freezer for 15 minutes before whipping. Cold equipment helps the cream whip faster and hold its peaks better.
- Layer like a pro: For Instagram-worthy layers, alternate small spoonfuls of cheesecake mixture with Oreo crumbs to create distinct stripes visible through clear cups.
- Let the flavors marinate: These cups are good after 4 hours, but they’re absolutely phenomenal after sitting overnight. The cookies soften slightly and the flavors meld into something magical.
- Storage perfection: Cover tightly with plastic wrap to prevent the cheesecake from absorbing refrigerator odors. They’ll keep beautifully for up to 5 days.
- Serving temperature: Take them out of the fridge about 10 minutes before serving for the creamiest texture and best flavor release.
Serving Suggestions
- Coffee pairing perfection: Serve alongside freshly brewed coffee or espresso to complement the chocolate cookie flavor
- Fresh berry contrast: Top with fresh raspberries or strawberries for a pop of color and tartness that cuts through the richness
- Elegant presentation: Dust with cocoa powder or add a dollop of whipped cream and a mint sprig for special occasions
- Cookie variety: Try using different Oreo flavors like Golden Oreos, Mint Oreos, or Birthday Cake Oreos for fun variations
- Party presentation: Arrange on a tiered serving stand with small spoons for an elegant dessert buffet display
Nutritional Benefits
While these are definitely an indulgent treat, the cream cheese provides protein and calcium, and you can feel good about the portion control aspect of individual cups. For a lighter version, you can substitute Greek yogurt for half the cream cheese, though the texture will be slightly less rich and creamy.
Frequently Asked Questions
Can I make these ahead of time?
Absolutely! These no-bake Oreo cheesecake cups are actually better when made a day ahead. The flavors develop and the texture becomes even more luxurious after sitting overnight in the refrigerator.
What if I don’t have individual cups?
You can absolutely make this as one large cheesecake in a 9-inch pie pan or springform pan. Just press all the Oreo crust into the bottom, add all the filling, and top with crushed cookies. Slice and serve when ready.
Can I freeze these for later?
Yes, but with a caveat. The texture will be slightly different when thawed – a bit denser and less fluffy. If you do freeze them, thaw completely in the refrigerator overnight before serving.
How can I make these gluten-free?
Simply substitute your favorite gluten-free chocolate sandwich cookies for the Oreos. The technique remains exactly the same, and the results are equally delicious.
These no-bake Oreo cheesecake cups are proof that the most impressive desserts don’t always require the most complicated techniques. With just a few quality ingredients and some gentle folding, you’ll create individual masterpieces that taste like they came from a high-end bakery. Trust me, once you see how easy these are and taste how incredible they turn out, you’ll be finding every excuse to make them again and again.